I have all the FABulous Blocks and I just can't wait one more day.
So I worked up all the tickets and printed out the Wonderful poems for the Hand of the Picker to read. Absolutely delighted with them. Lots of giggles and so many compliments.
The Lucky WINNER's this month are ... SoozG (Susan) and Me!!!!!
THANK YOU Oh Mighty Hand of the Picker!!!!!!!
****************************************************
Hi Pals What and incredible January we had. Awesome blocks made by all!!! So for FEBRUARY you all deserve some WINNING HANDS BLOCKS for a great start to the New Year!!! I really want to include as many QIAD Blocks as possible this year. I could not find a tutorial for it but I did write out the directions from the book i bought years ago. Don't think I will get in trouble. It might be an encouragement for you to pick up the book. I have read through the directions but it is always best to have other eyes so PLEASE TELL ME if something needs to be re-worded. I think I am good.
* The colors will be NON-Bleeding Red TOT's and PRINTS that are dominant red (I have a strawberry print); Red with Chocolate
* Background will be a WHITE ON WHITE.
* NO SOLIDS or STRIPES PLEASE!!
* Each of the Blocks are = 12" or 12.5"+ unfinished blocks
* DO NOT SQUARE UP. STOP AFTER YOU ADD THE TRIANGLES
* Attach a name label to the upper FRONT corner of EACH block
* Please MAIL NO LATER THAN the 24th of the month. PLENTY OF TIME
* Please send $2-$3 to help with sending to the winners
* 1 ticket = Signups anytime (No commitments here - Just try hard)
* 1 ticket = for each block
* 1 tickets = if your blocks reach me by the 25th
* 1 ticket = for Poetic bribes
* 2 tickets = block with a bit of chocolate and Hearts
* 3 tickets = if your blocks reach me by my Anniversary (the 14th)
-------------------------------------------------
** The link to buy the book if you choose is ...
http://www.quiltinaday.com/shoponline/b ... e/book/637
*** Please watch the beginning of this link so that you will understand what to do before you cut. You won't get all of the video but it will make sense.
http://www.thequiltingschool.com/index. ... 666a1e163f
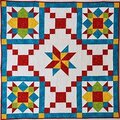
Here is how the block will look when finished.

--------------------------------------------------------------
Instructions to make 4 blocks … you are cutting (Width of Fabric)
FABRIC: "A" & "C"
cut ONE 3 1/2" wide strips (Mark strips A & C)
cut ONE 6" wide strips of A & C (Mark your strips A & C)
FABRIC: "B" & "D"
cut ONE 3 1/2" wide strips (Mark your strips B & D)
cut ONE 3 1/4" wide strips of B & D (Mark strips B & D)
FABRIC: background
cut TWO 3 1/4" wide strips
cut TWO 6" wide strips
*Sew Fab B and A together. Sew Fabric D and C together. Press to A and C sides and cut into 3.5” sections making sure the line of your ruler is on the seam line NOT the edge of the fabric. Place A/B section on top of D/C to make your 4 patch - locking seams. SQUARE 4-Patch block to 6".
*Lay D 3.25" strip on table. Lay all 4-patch blocks with “D” in the upper left corner to the right of the strip. Flip each block over and pin to the strip with equal spacing in between each block. Sew. Cut apart while block is still on top. Press away from 4 patch and trim.
*Do the same as above with the B fabric of the 4-patch in the upper left corner next to the B 3.25” strip. You now have a 4-patch with 2 ends.
Sew a Bkgrd strip to both sides of A & to C … Cut into (4) 3.25” sections (1-A and 1-C for each block). Match the A fabric section to your A fabric on the 4-patch and sew. Match the C fabric section to your C fabric on the 4-patch and sew. Press away from your 4-patch.
*** Cut your 6" wide background strips into 6" squares and then cut once on the diagonal. These become your corners. Place 1 triangle on every side of your block centering the tip of the triangle with the center seams of your 4-patch. Pin and Sew. Then STOP - STOP - STOP - YOU ARE FINISHED – CONGRATULATIONS!!!! The winners decide which way to size this block.
-----------------------------------------------------------------
TeresaK - Teresa ... 7 blocks ... finished ... PB
Quiltgram - Velda ... 4 blocks ... arrived
SoozG - Susan ... 8 blocks ... arrived
Maryq - Mary ... 4 blocks ... arrived
Xochitl (Sochil) ... 2 blocks arrived
WeSignificant - Valerie ... 4 blocks
*********
DIRECTIONS TO MAKE 1 BLOCK .........................
This is the order in which you will sew.
Fabric A,B,C,D - Make a 4-patch using 3.5" Sq's. Square to a 6" Block.
Fabric B
6” x 3.25” rectangle (add to end of “B Fabric” 4-Patch) See Picture
Fabric D
6” x 3.25” rectangle (add to end of “D Fabric” 4-Patch) See Picture
Fabric A
6” x 3.25” rectangle with (2) 3.25” Bkgrd Sq’s sewn to each end of Rectangle and then sewn to side of block.
Fabric C
6” x 3.25” rectangle with (2) 3.25” Bkgrd Sq’s sewn to each end of Rectangle and then sewn to side of block
Background Fabric Triangles
2 – 6" Sq’s (cut in half once diagonally making 2 triangles per 6" block) Sew 1 to each side of block with points of triangle lined up with center seam of 4-patch
STOP = YOU ARE FINISHED = DO NOT SQUARE UP YOUR BLOCK.
 Vel
Vel